TL;DR: If you’re just here for the commands, jump to the Quick Reference at the bottom.
Why I Needed This
I’ve been working with devcontainers for my projects, and every time I start a new project, I end up waiting for some time for Docker to download and install Hugo, Bun, and other dependencies. It wasn’t too long of a wait (maybe 30-40 seconds), but it’s annoying enough to start thinking about doing something about it.
Another reason is that each of my projects had its own Dockerfile in devcontainer setup, so when I changed something in the image and wanted to propagate it to other projects I had to do it manually.
The solution? Pre-build my devcontainer images and host them on GitHub Container Registry (GHCR). This way:
- I can reuse the same image across multiple projects
- Container startup becomes almost instant (just pulling instead of building)
- I maintain one
Dockerfileinstead of copying it everywhere
Sounds simple, right? Well, it mostly is, but I ran into a few gotchas along the way.
The Authentication Puzzle
My first question was pretty straightforward: “Can I just use SSH authentication like I do for Git?”
Nope. Container registries use token-based authentication over HTTPS. SSH keys and Docker credentials are completely separate systems. So even though I can push code to GitHub via SSH, I still needed a Personal Access Token (PAT) for pushing images.
Fine-Grained Tokens? Not Yet.
I wanted to use fine-grained PATs since they’re more secure - you can scope them to specific repositories and set granular permissions. But here’s the kicker: GitHub Container Registry doesn’t support fine-grained tokens.
I spent some time searching for a workaround, but it’s a known limitation. The GitHub community has been asking for this feature since at least 2022, and it’s still not available as of 2025.
So we’re stuck with classic tokens for now. ¯\_(ツ)_/¯
Creating the Classic Token
Here’s what you need to do:
- Go to GitHub Settings → Developer settings → Personal access tokens → Tokens (classic)
- Click “Generate new token (classic)”
- Give it a descriptive name (I used “GHCR Push Token”)
- Select these scopes:
write:packages- Lets you upload imagesread:packages- Lets you download imagesdelete:packages- Optional, for cleanuprepo- Optional, but nice for linking images to repos
- Set an expiration (I went with 1 year)
- Copy the token immediately! You won’t see it again.
Save it somewhere safe - password manager, encrypted notes, whatever works for you. Just don’t commit it to a repo.
Logging Into GHCR
I wondered if this login was permanent or if I needed to save the token somewhere special like .ssh directory. Turns out, Docker stores credentials in ~/.docker/config.json. The login persists until:
- You run
docker logout ghcr.io - The token expires
- You delete the config
Also worth noting: the gh CLI and Docker use completely different authentication systems. Having gh set up doesn’t help with Docker, and vice versa.
To log in:
echo YOUR_TOKEN | docker login ghcr.io -u YOUR_GITHUB_USERNAME --password-stdin
Replace YOUR_TOKEN with the token you just created and YOUR_GITHUB_USERNAME with your actual GitHub username.
You should see Login Succeeded.
Building the Image
My Dockerfile was already set up for multiple architectures using ARG TARGETARCH:
ARG BUN_VERSION=1.3.2
FROM oven/bun:${BUN_VERSION}-alpine

ARG HUGO_VERSION=0.152.2
ARG TARGETARCH

RUN apk add --no-cache \
    ca-certificates \
    git \
    gcompat \
    go \
    wget

RUN set -eux; \
    wget -O hugo.tar.gz "https://github.com/gohugoio/hugo/releases/download/v${HUGO_VERSION}/hugo_extended_${HUGO_VERSION}_linux-${TARGETARCH}.tar.gz"; \
    tar -xzf hugo.tar.gz -C /usr/local/bin/ hugo; \
    rm hugo.tar.gz; \
    hugo version
For my first build, I used the standard docker build command:
docker build \
  -t ghcr.io/gatezh/devcontainer-hugo-bun:hugo0.152.2-bun1.3.2-alpine \
  -t ghcr.io/gatezh/devcontainer-hugo-bun:latest \
  .
As you can see, I chose to add hugo0.152.2-bun1.3.2-alpine to be aware of the versions I’m using.
This worked perfectly - both tags created, build finished in seconds (thanks to layer caching).
Pushing to GHCR
docker push ghcr.io/gatezh/devcontainer-hugo-bun --all-tags
Success! The image was on GHCR. I could see it in my GitHub packages.
Wait, Where’s AMD64?
I checked my package page and saw something weird under “OS/Arch”:
linux/arm64
unknown/unknown
Where’s linux/amd64? I had TARGETARCH in my Dockerfile specifically for multi-platform support!
Here’s what I learned: docker build only builds for your current platform, even if your Dockerfile is multi-platform ready. I’m on Apple Silicon (ARM64), so I only got an ARM64 image.
The unknown/unknown entry is just build attestation metadata from Docker - you can ignore it.
⚠️ This means my image would only work on ARM machines. If I try to use it on Intel/AMD (like on GitHub Codespaces for example) I would get an error.
Building for Both Platforms
To actually build for multiple architectures, you need to use docker buildx command:
docker buildx build \
  --platform linux/amd64,linux/arm64 \
  -t ghcr.io/gatezh/devcontainer-hugo-bun:hugo0.152.2-bun1.3.2-alpine \
  -t ghcr.io/gatezh/devcontainer-hugo-bun:latest \
  --push \
  .
Key differences:
--platform linux/amd64,linux/arm64tells it to build for both--pushis required (you can’t load multi-platform images locally)- Docker automatically sets
TARGETARCHcorrectly for each platform
After the push completed, my package page now showed:
linux/amd64 ✓
linux/arm64 ✓
unknown/unknown (attestation)
Perfect! Now I can use this image on my M3 macbook and on GitHub Codespaces.
The Devcontainer Confusion
This is where things got a bit confusing for me. I had:
- A
.devcontainerfolder with a Dockerfile - Images now sitting in GHCR
- No clear idea how these two things connected
My question was: “How do I link the source code (Dockerfile) to the artifact (image)?”
It seemed like I was missing something fundamental about the workflow.
How It Actually Works
The key insight: the Dockerfile and the image are decoupled.
What I was doing before (slow):
// devcontainer.json
{
  "build": {
    "dockerfile": "Dockerfile"
  }
}
This builds from the Dockerfile every time you open the devcontainer.
What I should do now (fast):
// devcontainer.json
{
  "image": "ghcr.io/gatezh/devcontainer-hugo-bun:latest"
}
This just pulls the pre-built image.
The workflow is:
- Maintain the Dockerfile somewhere (could be a dedicated repo, could be in one main project)
- When you update Hugo/Bun versions, rebuild and push to GHCR
- All your projects reference the image directly
For updates, the process is:
- Edit the Dockerfile (change version numbers)
- Run the buildx command to rebuild and push
- Projects using
:latestautomatically get the update next time they rebuild
You can also use specific version tags (like hugo0.152.2-bun1.3.2-alpine) if you want to pin to a specific version of an image.
Organizing Dockerfiles
I’ve looked into best practices for organizing this. There are two common approaches:
Option 1: Dedicated devcontainer-images repo
devcontainer-images/
├── README.md
├── hugo-bun/
│   ├── Dockerfile
│   └── README.md
├── python-data-science/
│   ├── Dockerfile
│   └── README.md
└── .github/workflows/
    └── build-and-push.yml
This is cleaner if you plan to have multiple different devcontainer images. You can even set up GitHub Actions to automatically build and push when you update the Dockerfile.
Option 2: Keep Dockerfile in your main project
The Dockerfile lives in one project (like your blog), and other projects just reference the image. Simpler, but less organized if you have many images.
I’m leaning toward Option 1 since I’ll probably create more images in the future.
Dedicated repo
So I’ve decided to go with the dedicated repository approach. Not only because it allows me to neatly organize my Dockerfiles and suggested devcontainer.json config files. It also allows me to add GitHub Actions workflow so that whenever I update any of my Dockerfiles it automatically builds and pushes new images to my registry.
I won’t go into too many details about the repo since you can simply look at the repo itself here.
The only thing to mention is that when you create such a repository you can link it with your Docker images (packages) on the Packages page so it shows the README from your linked repo.
The last issue
When I tried to test my GitHub Actions workflow and automatically build my images when Dockerfile changes I got an unexpected surprise:
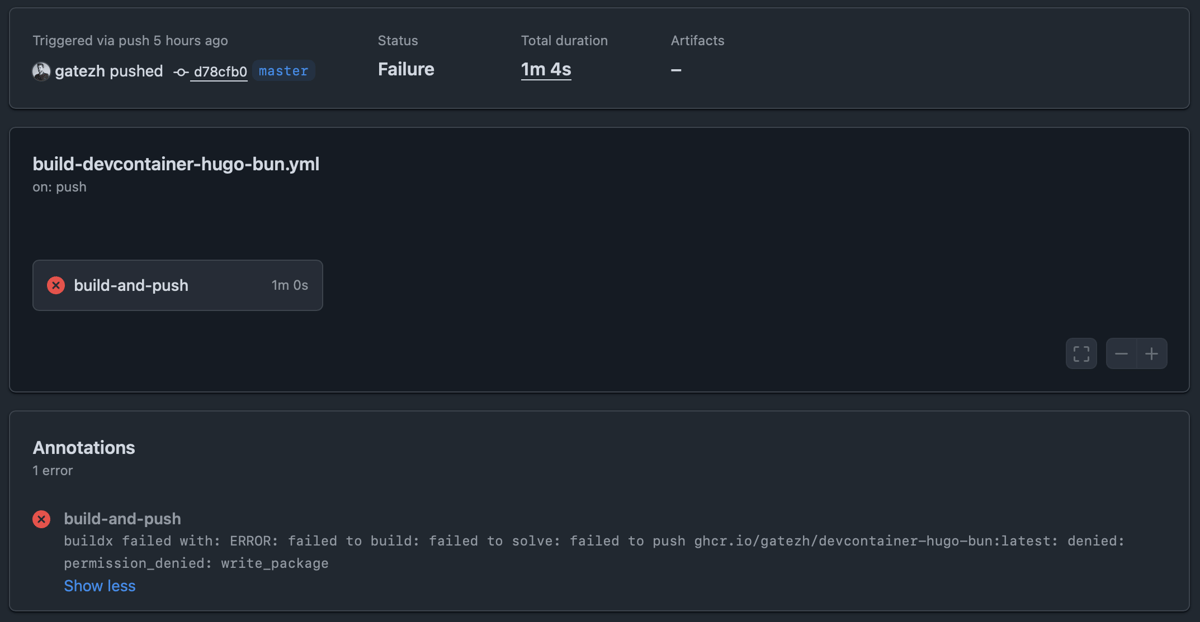
Fortunately the fix is pretty simple. Since I previously created my Docker image (package) manually I just needed to:
- Go to the package settings (on GitHub, navigate to your profile/org → Packages → select the package)
- Scroll to “Manage Actions access”
- Add your repository with “Write” role
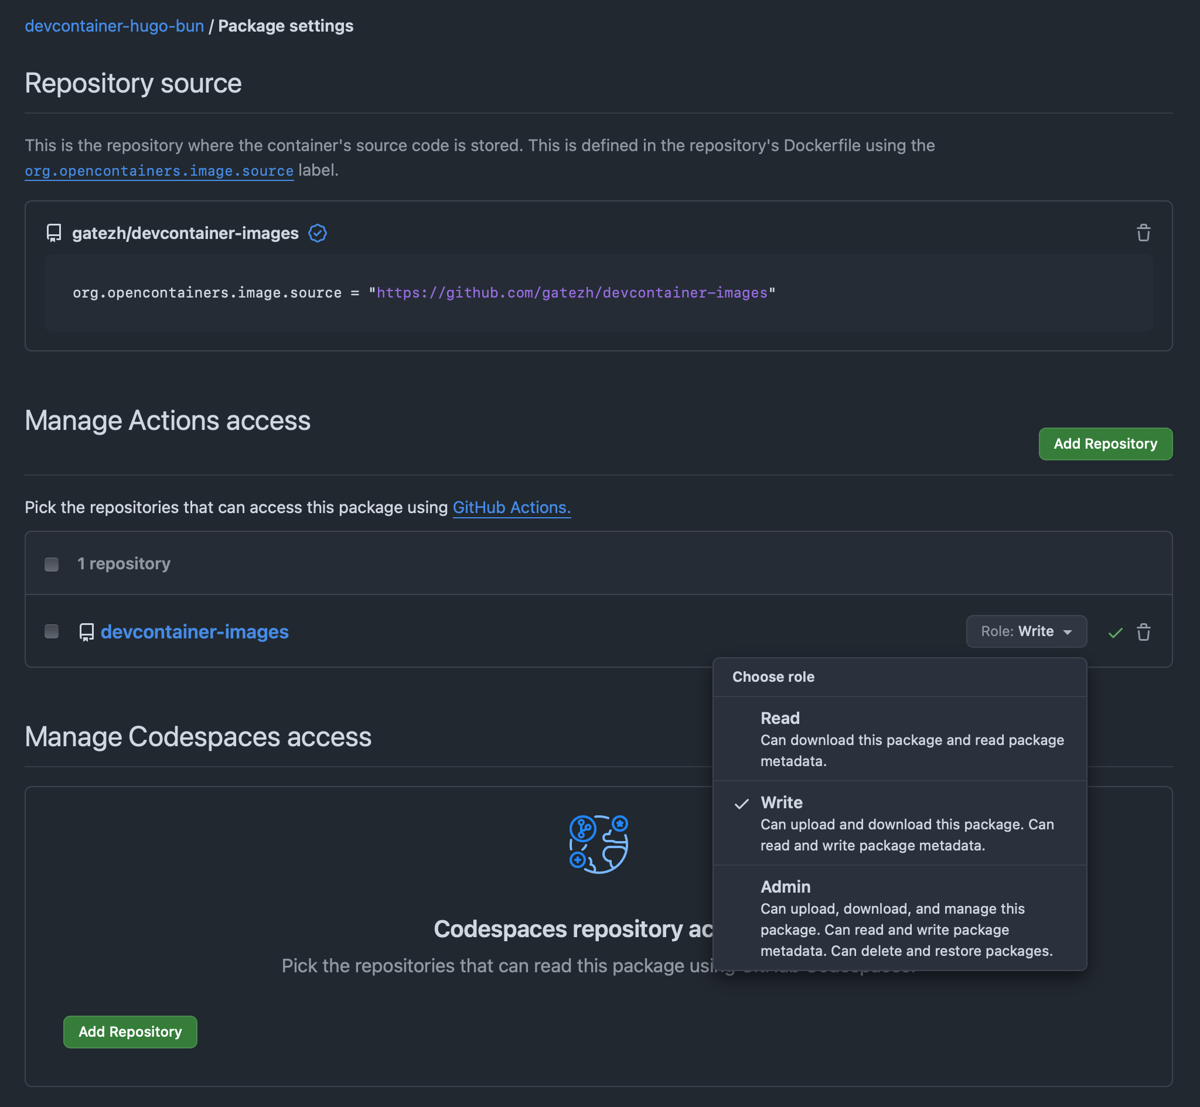
That did the trick and the following updates were built and published to my registry automatically. Nice 😎
Quick Reference
For those who just need the commands:
1. Create a Classic Personal Access Token
- GitHub Settings → Developer settings → Personal access tokens → Tokens (classic)
- Generate with scopes:
write:packages,read:packages,delete:packages(optional),repo(optional) - Copy and save the token
2. Authenticate Docker with GHCR
echo YOUR_TOKEN | docker login ghcr.io -u YOUR_GITHUB_USERNAME --password-stdin
3. Build Multi-Platform Image
docker buildx build \
  --platform linux/amd64,linux/arm64 \
  -t ghcr.io/YOUR_USERNAME/IMAGE_NAME:TAG \
  -t ghcr.io/YOUR_USERNAME/IMAGE_NAME:latest \
  --push \
  .
4. Verify on GitHub
Visit https://github.com/users/YOUR_USERNAME/packages and check the “OS/Arch” tab shows both architectures.
5. Update Your devcontainer.json
{
  "image": "ghcr.io/YOUR_USERNAME/IMAGE_NAME:latest"
}
Conclusion
It was a great learning experience to get my Docker images standardized and have a single source of truth for all of my projects that use the same tech stack.
Check out my devcontainer-images repository to see whatever is omitted in this article.
If you find my writing useful, or feel like I missed something in my tutorial – let me know in the comments below!
Useful Links: